Pages

Showing posts with label gradient. Show all posts

Tuesday, December 24, 2013

Christmas Nails!

...ooops. Guess who slacked off drastically on posting her recent manis? Yep, that would be me! 

So I've got a few to catch up with...


This one was pretty simple. Just a sponged gradient of Sinful Colors Call You Later over Sinful Colors Tokyo Pearl (very frosty, I did two coats and then sponged on a third for a less brushstrokey finish).


Time for a glitter party! I started with two coats of NOPI Best Pink Ever (I have the same settling problem with my bottle as a lot of people, I had to shake it up very well before use) and then one coat of China Glaze Glitter All The Way, which applied like butter. No fuss!


Going for a wintery, frosty effect and something vaguely resembling a pine tree... I did a base of three coats of Sinful Colors Cinderella, and dotted with an unknown grey Color Club with a light silver shimmer.


(sorry for the cat hair, the stuff gets *everywhere*)

I used a forest-green Color Club (name unknown) for the base on this one, followed by one dabbled coat of Wet & Wild Mountain High. The glitters in Mountain High are fun, but the consistency is terrible. It was incredibly difficult to get even glitter coverage, and there was the added difficulty of keeping the milky base even. Do not recommend unless you're prepared to baby it A LOT.

Finished off the look with a cute Santa decal and a gold star from some loose glitter I've got left over from a craft project.

I'll have one more for ya coming up soon, it's too dark now for pictures unfortunately. My actual Christmas-day mani!

Monday, December 9, 2013

Timeless Sequins

I'm starting to get into the holiday groove, but not quite ready for a full-on CHRISTMAS IN YOUR FACE mani (I'll get there!) So I decided on something that could go festive, but wouldn't go amiss anytime.


I started with two coats of Covergirl Timeless Rubies, a glorious soft red glassfleck, and sponged on a gradient with L'Oreal Sexy in Sequins. Oh how I love such glitter-heavy pretties!

Saturday, November 9, 2013

Fall Fantasy

I always get kinda bummed out at the end of nice weather and sunny warm lovely perfection. It takes a while to give it up and accept the winter... 

On that kind of theme I did my nails in fall/wintery colors but added a flower accent. 


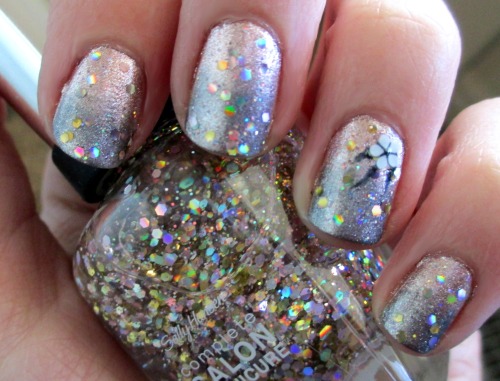
First I did a gradient with Sinful Colors Supernova and Hot Wired, then topped that with a coat of Sally Hansen Twinkle Toes-ty. For the accents I freehanded leaves with Revlon Mistletoe, then smacked a flower decal on and finished off with topcoat.

I'd like to take a moment to fangirl about Twinkle Toes-ty since it's pretty much awesome and the second best holiday polish I've seen yet this year (the best is being reserved for my Christmas mani, Sally Hansen Midnight Glitz) -- I guess "best" is relative but... MY favorite, at least! But a chunky gold-and-silver holo glitter bomb that doesn't eat top coat or have even a bit of a tacoing issue and doesn't require much fussing to get a good glitter distribution? Yes please!

Saturday, March 9, 2013

Butterfly Reloaded

Something a little rocker-y today, again with the pinky accent...


For this mani I started with a base of Essence Chic Reloaded, sponged on a gradient from the cuticle with Sally Hansen Diamond Strength Aisle Be There, and added a Kiss decal for an accent. 

Girly but badass, my favorite sort of style! :D

As always, I'm a sucker for duochromes. The second I saw Chic Reloaded I had to have it, even though I'm pretty sure it's a close mimic if not a dead-on dupe for Sally Hansen Diamond Strength Black Tie, which I've had for quite a while and just never really got around to using... nothing wrong with having a backup bottle of an awesome shade, after all!

I've really gotta pare down my polish purchasing, though. It's feeling a bit out of control lately. :/ 


Thursday, March 7, 2013

First Featured Polish: St. Patrick's Edition

So I've had this idea kicking around for a while, to do "featured polishes", where I take one polish and do a bunch of nail art using it and generally show off how awesome or un-awesome it is. 

Since St. Patrick's is coming right up, I had to pick a green. So today I present to you, in all its glory (for everything except.... well, you'll see) *drumroll* 

Sinful Colors San Francisco!

First up, I thought I'd show how the polish builds. It starts out pretty sheer, but two coats would be acceptable on short nails, full coverage and perfect bottle color in three:
(ready? One, two three!)


I just realized you can see some nail line on my index and middle nails in the photo still... rest assured, that wasn't visible IRL!

Note this is a stainer! I highly recommend doubling up on base coat.

Next, since it's a bit on the sheer side, I thought it might be cool to see how it layers, with one coat over white (Wet & Wild French White Creme) and black (Wet & Wild Black Creme):

Oooh lookie how pretty over black!

I tried stamping, it really is far too sheer for that... *might* show over white, but after this test I really didn't want to even bother trying.

Barely even shows stamping in a macro. Works fine with a dotting tool, however! The gold is Wet & Wild Chrome A Show At The Palladium.

Whew, that was a failure! Now let's get on to the successful nail art looks I tried! 

Ruffian style with Wet & Wild Chrome I Got A New Com-Pewter

 
Gradient over Sinful Colors Last Chance

Mattified under NOPI White Texture (how cool that the white turned green! It sure is a stainer haha!)

With Wet & Wild Coloricon Frosted Over, freehand on my index and pinky, brush over stamp on my ring finger, and layered as undies on my middle.

What a lot of fun that was! I think I'll do it again one of these days. Unless everyone hates it. Please tell me you don't hate it! I'll do requests! 

Seriously, I would love feedback. Since this is a new thing, obviously it might have kinks to smooth out. Let me know what you think?


Saturday, February 23, 2013

Holoberry gradient

I do love me some glittery gradient prettiness. 


The base of this one is Sinful Colors Winterberry, which is absolutely right up my alley. A greyed-out purple with shimmer? One-coat potential? Yes please! (I used two coats here, but only because I painted super thin to save drying time)

For the gradient I pulled out a franken I made a while ago, using an old Maybelline polish I'd had for ages and used up half of (despite being disappointed by the lack of duochrome on the nail, hope of which was the reason I had bought it... the bottle lied!) and half a bottle of Wet & Wild Fastdry Hannah Pinktana. 

I haven't named this particular franken yet, and the lack of name is bugging me! Any suggestions?

Tuesday, July 31, 2012

31 Day Challenge Day 10 - Gradient

I've seen some really lovely holo gradients around the nail blogging world, so of course on gradient day I had to try one.


I used all Wet & Wild polishes for this (again, haha), starting with a base of Metallica from the Wild Shine line. It makes a good base for sheer polishes, a little shimmer without color interference, and a little toning down of the shade for those of us who don't like the brightness that a white base gives.

For the gradient I used Blue Wants To Be A Millionaire and Hannah Pinktana from the Fastdry line. These both have scattered (nonlinear) holo microglitter in a very sheer jelly base, light blue and dusty pink respectively. 

My camera doesn't do justice to the holo in these babies. I did get an intentionally blurred pic that shows it off a little better:


These are really nice inexpensive holos ($2!) even if they're not as blingy as some of the pricier options. It takes a few coats to build up the glitter, but it's lovely. Sponging it on gives more glitter and less base on the nail, to speed things up.


Friday, July 27, 2012

31 Day Challenge Day 9 - Rainbow

I had to think long and hard about what to do for Rainbow. I decided it would be an excellent opportunity (like this whole challenge, really) to use several of my untried polishes. Here's what I finally came up with:


For the sake of because I felt like it, I decided to use Wet & Wild polishes for as much of this as possible, which means everything except orange. But then I decided to use an untried white for the base instead of French White Creme (which, turns out, is a better/less streaky formula... oh well now I know), I used L.A. Colors - Energy Source. 

Going from red -> purple, the polishes used (all Wet & Wild except for orange, as noted):
Jezebel
Sinful Colors - Patrika
The Wonder Yellows
Sage in the City
Blue Bijou
Eggplant Frost

Jezebel, Blue Bijou, and Eggplant Frost are from the Wild Shine line, while The Wonder Yellows and Sage in the City are Fastdry.

After doing a sideways gradient to try to blend the colors together across all the nails, which turned out a little rougher than I would have liked, I decided it needed more bling so I added a coat of Wet & Wild Wild Shine - Hallucinate, an iridescent-holo glitter topcoat. 


Wednesday, June 27, 2012

31 Day Challenge Day 4 - Green

This mani was done for a friend who specifically requested it, inspired by a custom-painted keytar played by the keyboardist of our favorite band. First the inspiration:

Henrik Klingenberg from Sonata Arctica with his epic green keytar

Now the nails!


I used L.A. Colors - Palm Tree for the base, and used tape to mark off the pieces on all but my thumb, painted over with Wet & Wild Wild Shine - Metallica. On the thumb I tried to re-create the gradient on the actual keys with the sponging method and the same colors.


Friday, June 15, 2012

31 Day Challenge Day 1 -- Red

I've been slacking on nail art lately, so I think it's time to dig out my folder of Challenges that I've been stashing for a while. I'll go ahead and start with the 31 Day Challenge. Day 1 is Red.


I used my favorite classic red, Color Club - Red Cadillac, and sponged Sally Hansen Gem Crush - Cha-Ching! on the tips. Yeah, I really like glitter tips. 


Monday, April 23, 2012

Sinful Colors/W&W sponged gradient

Here I did a gradient with Sinful Colors - Let's Talk sponged over Sinful Colors - Fiji with a topcoat of Wet & Wild Wild Shine - Kaleidoscope.  The end result was pretty similar to Purple-xing but with subtle gradient.


... I love purple. And holo glitter. 

Monday, April 9, 2012

Nina Ultra Pro Purple-xing and Sally Hansen Gem Crush Lady Luck

Purple-xing is a purple creme base with silver microglitter and larger holo glitter. Possibly some smaller holo glitter as well but there's too much going on here to be sure! Surprisingly enough the base doesn't dull the glitter much. A little, but not as much as I expected it to. Pic is with top coat, this doesn't dry super shiny.


After wearing this at work and chipping the hell out of the tips, I wasn't quite ready to take it off yet so I covered up the chipping by sponging on gradient tips with Lady Luck:


Like everything in the Gem Crush line, Lady Luck has a clear base packed with microglitter and a scattering of larger pieces. Here the microglitter is pink and the larger glitters are holo, the same as the larger holo glitters in Purple-xing. This was super gritty and took several layers of topcoat to smooth out, but I love the glitter bomb effect :D