Pages

Showing posts with label nail art. Show all posts

Saturday, December 28, 2013

Starry Mint

A little bit of a palate-cleanser after all the glitter and bling...


Two coats of Sinful Colors Mint Apple, and stars stamped with a dark blue Color Club jelly polish and BM14


Thursday, December 26, 2013

Christmas Day Mani

This year my special holiday polish was Sally Hansen Midnight Glitz. OMG such a fun glitter! But, unlike past holiday polishes, this one just couldn't be used on its own due to not being full-coverage.


And since none of my earlier festive nails this year incorporated both red and green polishes, and I was feeling moderately lazy but immensely festive... this is what I came up with. 

Nothing too fancy in the execution, just alternating colors and glitter with matte top coat. 

Originally I was planning to go shiny, but I used matte polishes for my bases -- Revlon Fire Fox and Emerald City, specifically -- and before putting on the glitter I took a good look at 'em and got bitten hard by the matte bug. So I finished off with Hard Candy's matte topcoat instead of my usual shiny one. 

Unfortunately though, mattifying dulled the holo glam of the smaller gold glitters. Still, a great Christmas mani which I got lots of compliments on.


Tuesday, December 24, 2013

Christmas Nails!

...ooops. Guess who slacked off drastically on posting her recent manis? Yep, that would be me! 

So I've got a few to catch up with...


This one was pretty simple. Just a sponged gradient of Sinful Colors Call You Later over Sinful Colors Tokyo Pearl (very frosty, I did two coats and then sponged on a third for a less brushstrokey finish).


Time for a glitter party! I started with two coats of NOPI Best Pink Ever (I have the same settling problem with my bottle as a lot of people, I had to shake it up very well before use) and then one coat of China Glaze Glitter All The Way, which applied like butter. No fuss!


Going for a wintery, frosty effect and something vaguely resembling a pine tree... I did a base of three coats of Sinful Colors Cinderella, and dotted with an unknown grey Color Club with a light silver shimmer.


(sorry for the cat hair, the stuff gets *everywhere*)

I used a forest-green Color Club (name unknown) for the base on this one, followed by one dabbled coat of Wet & Wild Mountain High. The glitters in Mountain High are fun, but the consistency is terrible. It was incredibly difficult to get even glitter coverage, and there was the added difficulty of keeping the milky base even. Do not recommend unless you're prepared to baby it A LOT.

Finished off the look with a cute Santa decal and a gold star from some loose glitter I've got left over from a craft project.

I'll have one more for ya coming up soon, it's too dark now for pictures unfortunately. My actual Christmas-day mani!

Monday, December 9, 2013

Timeless Sequins

I'm starting to get into the holiday groove, but not quite ready for a full-on CHRISTMAS IN YOUR FACE mani (I'll get there!) So I decided on something that could go festive, but wouldn't go amiss anytime.


I started with two coats of Covergirl Timeless Rubies, a glorious soft red glassfleck, and sponged on a gradient with L'Oreal Sexy in Sequins. Oh how I love such glitter-heavy pretties!

Thursday, December 5, 2013

Accent Bling

Feeling crummy after getting orthodontic work done, I figured I'd break out some holo and glitter to cheer myself up a little.


Wasn't really feeling like doing too much fancy, so I stuck with a simple two-polish accent nail mani. But then, I did pick fancy-on-their-own polishes... 

For the main color I used Color Club Kismet, which is a slightly yellow-green tinted holo. For the accent I used Maybelline Silver Swank, which in direct light has a yellow-gold glow. 

I was a bit wary of using two blingy polishes at once, I wasn't sure the competing AWESOME would work out so well. But it turned out quite nice I think!

Saturday, November 30, 2013

Moon Strobe

I've been on a french-tip kick lately. 


Here I started with two coats of Sally Hansen Moonstone, freehanded the tips with the bottle brush of Maybelline Cool Couture (which has a nice hidden purple shimmer that really doesn't show after glitterfying), dotted along the line with Sinful Colors Lavender, then decided it needed more bling and finished up by adding another freehanded layer to the tip with Sally Hansen Strobe Light.

Wednesday, November 27, 2013

Cranberry Leaves

This is not a Christmas mani. This is a Thanksgiving mani! I have personal rules about respecting holidays by not OD-ing on them before the prior holiday's even happened yet.


So here we go, inspired by cranberry sauce (om nom nom)!

I started with two coats of BB Paris Scarlet (could have done with three, but didn't realize quite how much VNL I had going on til after taking the pictures, oops!) then stamped some fancy leaf accents with Pure Ice Twinkle and the BM01 plate.

Sunday, November 24, 2013

Autumn French

This one I just threw together at work, in lousy lighting, so it's no surprise it turned out a little meh. Thought I'd share anyway though. 


I started with three coats of Covergirl Scalding Emerald (I'm obsessed with the glassfleck glosstini polishes! They're so shiny! Even though they run sheer I love 'em to pieces). 

Then I did a brushstroke down the middle of each nail with Covergirl Violet Flicker. It didn't show up nearly as well as I'd hoped, so for a little more visual interest I added a french tip with Finger Paints Winter Chill.

Thursday, November 21, 2013

Subtle Stamping

What can I say, I was feeling girly!


The base color here is Sinful Colors Soul Mate, stamped with RA-116 and Wet & Wild Deadly Dose.

Saturday, November 9, 2013

Fall Fantasy

I always get kinda bummed out at the end of nice weather and sunny warm lovely perfection. It takes a while to give it up and accept the winter... 

On that kind of theme I did my nails in fall/wintery colors but added a flower accent. 


First I did a gradient with Sinful Colors Supernova and Hot Wired, then topped that with a coat of Sally Hansen Twinkle Toes-ty. For the accents I freehanded leaves with Revlon Mistletoe, then smacked a flower decal on and finished off with topcoat.

I'd like to take a moment to fangirl about Twinkle Toes-ty since it's pretty much awesome and the second best holiday polish I've seen yet this year (the best is being reserved for my Christmas mani, Sally Hansen Midnight Glitz) -- I guess "best" is relative but... MY favorite, at least! But a chunky gold-and-silver holo glitter bomb that doesn't eat top coat or have even a bit of a tacoing issue and doesn't require much fussing to get a good glitter distribution? Yes please!

Tuesday, November 5, 2013

Back from the dead with a belated Halloween post

Yes, it's true I've been gone for a while! In my defense... well... I guess I'd better just admit that I did a stupid and dropped my camera in the ocean while on vacation, and then procrastinated replacing it. 

But now I have a new one, so it's time to get this thing going again! 

The first thing I got to take pictures of was my Halloween costume, so let's go with that for a welcome-back-to-blogville post!


Why yes, I did decide to be a massive geek and dress up as the TARDIS for Halloween. More specifically, the TARDIS as the Paradox Machine. I definitely took a little artistic license with that idea!  I wanted a damaged look, so shredded the skirt to let red layers and red skinny jeans show through, put a flicker LED in the hat, and did some 'cracks' with cheap makeup: 


That's a dollar-store lipliner for the cracking bits, plus blue false lashes and blue eyeliner plus gold eyeshadow. I also dusted gold shimmer powder all over my skin.

And of course, it wouldn't be ME if I didn't do some fun nails to go with the costume. Keeping with the damage theme I *had* to use crackle polish... 


Pretty simple execution, two coats of Covergirl Midnight Magic topped with Sally Hansen Distressed Denim (the perfect TARDIS-blue crackle!)


Sunday, June 9, 2013

Lazy nail art with Pure Ice

I was feeling both fancy and lazy at once when I did this one. So... glitter, accent nail, and a decal!


I decided to do a twist on my usual accent style and actually use a completely different polish, rather than just slapping a decal on it and calling it good. 

The main polish I used is Pure Ice Irreplaceable, and for the accent I used Pure Ice Private Show. The decal is from a Kiss set I picked up back when I first got into nail art.

Thursday, June 6, 2013

June Polish Days: To Boldly Go


It's that time again! And perfect timing for the space/sci-fi theme, since I just got into a new show (new to me, that is)... DOCTOR WHO! 

So, of course I had to do a DW themed mani. Even though I seriously considered taking the opportunity to show some love to my old favorite, Star Trek... I just couldn't resist the Who-ness.


Oddly enough the hardest part and what took the longest was the TARDIS nail. I'm apparently much better at semi-abstract stuff like nebulas and time vortices. Speaking of, I LOVE how the time vortex nails turned out! 
(If you're not familiar with the show, the vortex is blue when traveling into the past and red when traveling into the future.)

The nebula on my pinky doesn't have any direct connection to Who, but I thought it was appropriate considering they go all over space, including lots of nebulas.


Tuesday, May 28, 2013

Red Sky At Night

Speaking of how I still love crackles...


This was such a fun mani! I started with two coats of Wet & Wild Lavender Pearlescent (what's up with W&W and calling pinks "lavender", anyway?), added a coat of Sally Hansen Fractured Foil, then topped it off with Wet & Wild Hollywood Walk of Fame from the Fergie collection. Yes, I did have to fish-and-place the stars. Worth the trouble though, definitely! 

I had a bit of a problem with the corners of the stars sticking up off my nail, but only in a few spots and if your nails aren't as highly curved as mine you should be fine! I just added an extra layer of topcoat to keep 'em under control.

Saturday, May 25, 2013

Royal Teal

I found a set of Sally Hansen crackles at TJ Maxx, four of them for $5. Holy deal, Batman! I know, crackles get so little love anymore, but personally I still think they're awesome. Hopefully I can spread a little love for what to me is a vastly underrated effect. 

Gotta admit, I love me a good teal shimmer. And I love it even more combined with gold! So, I thought, what could be better than a gold crackle with teal beneath? What indeed, if not french tips? 


The base polish is Nina Ultra Pro Unteal You, which just might be my favorite teal of all time next to possibly one duochrome I can think of. No duochrome here, just a fantastically rich and shimmery jewel-tone teal. 

I freehanded the french tips with Sally Hansen Antiqued Gold and the bottle brush. 

Anyone else out there who still loves crackles?


Wednesday, May 22, 2013

Matte Hearts

Oh man, I LOVED this mani! Another I did super quick, but the polish I used just made me happy in so many ways. 


That super-happy-making polish is Zoya Nidhi (dries shiny, I used a matte topcoat here). Where do I even start with praising this one? I think I've found my go-to for "classic red". It's the perfect red for my skin tone, and complex enough to not bore me. I actually almost wanted to leave it alone and drop all my nail art aspirations, once I got it on my hands! The golden flecks are delicious as can be. Finally though, I decided this would be a good polish friend for some Kiss decals that I wasn't sure I would ever use. I'm just not a huge hearts person, TBH. 

But, I really like how this turned out. I'm glad I decided to use the decals, or I might not have thought of mattifying Nidhi... and matte definitely brings out the best in an already fabulous polish. 


Sunday, May 19, 2013

Barbie Pearl

This was a quickie manicure I did, I mostly just wanted hot pink, but I feel weird wearing no nail art anymore... so I blinged it up a little.


The polish I used was Sinful Colors Creme Pink, which is super bright and Barbie-ish, with a subtle gold shimmer. It dries semi-matte, but I used a shiny top coat this time. 

The bling is a Kiss decal from a set I picked up ages ago. The pearls are HUGE but surprisingly enough stayed on through a full day of work -- and when work is bartending, well... I just generally expect my nails to get ruined, especially when they've got fancy bits sticking out. Lucky me! 

I ended up taking this mani off after a day and a half though, the bumpy pearls were starting to really bother me and it was too much mental effort to stop myself from picking at them.

Thursday, May 16, 2013

Featured Polish: Finger Paints Art You Blue?

Alright, it's been a while in the works but here it is, Featured Polish #2: Finger Paints Art You Blue?


This is a shimmery denim blue with a nice and easy two-coat formula. 

Like before, I've put together several nail art looks incorporating this polish. 

First, as undies for glitter. I decided to do a two-finger accent for this one, using Revlon Hearts of Gold FX on my pinky and index (yes, a little fishing for the hearts was necessary), and Sally Hansen Xtreme Wear In The Spotlight for the rest.

Next up, I wanted to give texture another shot, and thought it might be interesting to do some nail art over a textured polish, so I brought out AYB for accent-nail polka dots over Milani Texture Purple Streak. 

Apparently I was on a bit of a purple streak myself, since this was the next thing to come to mind. AYB under China Glaze Fault Line, with stamped accent flowers done with BB Paris Cupcake and RA-121.

AYB does work well for stamping, as well: 


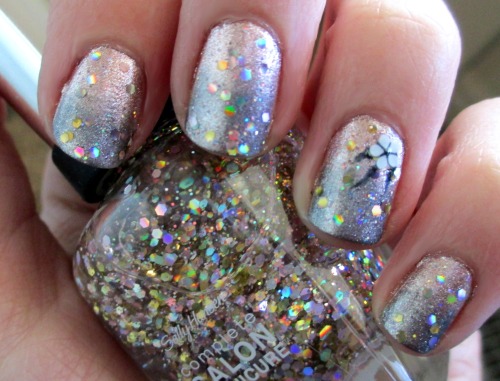
I used an L.A. Colors nude polish for the base, one that I bought in a set with no names... it's NOT Mega Watt, I couldn't find it in a google search. :/ But it's kind of a dupe or similar to OPI Sand in my Swimsuit, a light nude with a white shimmer... let me know if you know the name of it? 

I stamped with Art You Blue? and RA-108, then added a coat of Milani Diamond Dazzle for bling. 


Tuesday, April 30, 2013

Holographic Half-Moons

I've been slacking a bit lately, haven't I? Well... yes. And also working on a featured-polish post, but that's no excuse for neglecting to post a bit now and then! 

I do have a good one today, though!


Mmm, holographic! I have a hard time wanting to do fancy nail art with holographic polishes, since I feel like they're plenty fancy on their own and I don't want to distract too much from the inherent awesomeness. But on the other hand (hah!) I feel weird just painting my nails with one color anymore.

This time I just did a freehand half-moon over China Glaze When Stars Collide, using Sally Hansen Diamond Strength Black Tie. The duochrome in Black Tie got overwhelmed by the holo of When Stars Collide, but it still added a bit of subtle dimension to the moons. I think a creme would have just been too flat next to the holo! 

The pic was taken in direct sunlight, to best show off the holographic effect. These new China Glaze holos aren't as strong as the Color Club set I have, but still lovely, and this color in particular is gorgeous even without the holo effect. Also, I *was* able to use topcoat (NYC Grand Central Station) without dulling the rainbows.

Sunday, April 14, 2013

Black Tie Lilac

I'm feeling a bit pastel and spring-y, despite the lingering cold and rainy weather, so I pulled out a nice frosty lilac shade and had some fun!


The base is Pure Ice New Lilac (one coat, how awesome is that for a frosty polish? :D ) and after much thought of what to do about fancying it up a little I remembered I'd been meaning to play with Hard Candy Black Tie Optional. And sure enough, these two play well together!