Pages

Showing posts with label layering. Show all posts

Thursday, December 26, 2013

Christmas Day Mani

This year my special holiday polish was Sally Hansen Midnight Glitz. OMG such a fun glitter! But, unlike past holiday polishes, this one just couldn't be used on its own due to not being full-coverage.


And since none of my earlier festive nails this year incorporated both red and green polishes, and I was feeling moderately lazy but immensely festive... this is what I came up with. 

Nothing too fancy in the execution, just alternating colors and glitter with matte top coat. 

Originally I was planning to go shiny, but I used matte polishes for my bases -- Revlon Fire Fox and Emerald City, specifically -- and before putting on the glitter I took a good look at 'em and got bitten hard by the matte bug. So I finished off with Hard Candy's matte topcoat instead of my usual shiny one. 

Unfortunately though, mattifying dulled the holo glam of the smaller gold glitters. Still, a great Christmas mani which I got lots of compliments on.


Tuesday, December 24, 2013

Christmas Nails!

...ooops. Guess who slacked off drastically on posting her recent manis? Yep, that would be me! 

So I've got a few to catch up with...


This one was pretty simple. Just a sponged gradient of Sinful Colors Call You Later over Sinful Colors Tokyo Pearl (very frosty, I did two coats and then sponged on a third for a less brushstrokey finish).


Time for a glitter party! I started with two coats of NOPI Best Pink Ever (I have the same settling problem with my bottle as a lot of people, I had to shake it up very well before use) and then one coat of China Glaze Glitter All The Way, which applied like butter. No fuss!


Going for a wintery, frosty effect and something vaguely resembling a pine tree... I did a base of three coats of Sinful Colors Cinderella, and dotted with an unknown grey Color Club with a light silver shimmer.


(sorry for the cat hair, the stuff gets *everywhere*)

I used a forest-green Color Club (name unknown) for the base on this one, followed by one dabbled coat of Wet & Wild Mountain High. The glitters in Mountain High are fun, but the consistency is terrible. It was incredibly difficult to get even glitter coverage, and there was the added difficulty of keeping the milky base even. Do not recommend unless you're prepared to baby it A LOT.

Finished off the look with a cute Santa decal and a gold star from some loose glitter I've got left over from a craft project.

I'll have one more for ya coming up soon, it's too dark now for pictures unfortunately. My actual Christmas-day mani!

Saturday, November 9, 2013

Fall Fantasy

I always get kinda bummed out at the end of nice weather and sunny warm lovely perfection. It takes a while to give it up and accept the winter... 

On that kind of theme I did my nails in fall/wintery colors but added a flower accent. 


First I did a gradient with Sinful Colors Supernova and Hot Wired, then topped that with a coat of Sally Hansen Twinkle Toes-ty. For the accents I freehanded leaves with Revlon Mistletoe, then smacked a flower decal on and finished off with topcoat.

I'd like to take a moment to fangirl about Twinkle Toes-ty since it's pretty much awesome and the second best holiday polish I've seen yet this year (the best is being reserved for my Christmas mani, Sally Hansen Midnight Glitz) -- I guess "best" is relative but... MY favorite, at least! But a chunky gold-and-silver holo glitter bomb that doesn't eat top coat or have even a bit of a tacoing issue and doesn't require much fussing to get a good glitter distribution? Yes please!

Tuesday, May 28, 2013

Red Sky At Night

Speaking of how I still love crackles...


This was such a fun mani! I started with two coats of Wet & Wild Lavender Pearlescent (what's up with W&W and calling pinks "lavender", anyway?), added a coat of Sally Hansen Fractured Foil, then topped it off with Wet & Wild Hollywood Walk of Fame from the Fergie collection. Yes, I did have to fish-and-place the stars. Worth the trouble though, definitely! 

I had a bit of a problem with the corners of the stars sticking up off my nail, but only in a few spots and if your nails aren't as highly curved as mine you should be fine! I just added an extra layer of topcoat to keep 'em under control.

Sunday, April 14, 2013

Black Tie Lilac

I'm feeling a bit pastel and spring-y, despite the lingering cold and rainy weather, so I pulled out a nice frosty lilac shade and had some fun!


The base is Pure Ice New Lilac (one coat, how awesome is that for a frosty polish? :D ) and after much thought of what to do about fancying it up a little I remembered I'd been meaning to play with Hard Candy Black Tie Optional. And sure enough, these two play well together! 

Thursday, March 7, 2013

First Featured Polish: St. Patrick's Edition

So I've had this idea kicking around for a while, to do "featured polishes", where I take one polish and do a bunch of nail art using it and generally show off how awesome or un-awesome it is. 

Since St. Patrick's is coming right up, I had to pick a green. So today I present to you, in all its glory (for everything except.... well, you'll see) *drumroll* 

Sinful Colors San Francisco!

First up, I thought I'd show how the polish builds. It starts out pretty sheer, but two coats would be acceptable on short nails, full coverage and perfect bottle color in three:
(ready? One, two three!)


I just realized you can see some nail line on my index and middle nails in the photo still... rest assured, that wasn't visible IRL!

Note this is a stainer! I highly recommend doubling up on base coat.

Next, since it's a bit on the sheer side, I thought it might be cool to see how it layers, with one coat over white (Wet & Wild French White Creme) and black (Wet & Wild Black Creme):

Oooh lookie how pretty over black!

I tried stamping, it really is far too sheer for that... *might* show over white, but after this test I really didn't want to even bother trying.

Barely even shows stamping in a macro. Works fine with a dotting tool, however! The gold is Wet & Wild Chrome A Show At The Palladium.

Whew, that was a failure! Now let's get on to the successful nail art looks I tried! 

Ruffian style with Wet & Wild Chrome I Got A New Com-Pewter

 
Gradient over Sinful Colors Last Chance

Mattified under NOPI White Texture (how cool that the white turned green! It sure is a stainer haha!)

With Wet & Wild Coloricon Frosted Over, freehand on my index and pinky, brush over stamp on my ring finger, and layered as undies on my middle.

What a lot of fun that was! I think I'll do it again one of these days. Unless everyone hates it. Please tell me you don't hate it! I'll do requests! 

Seriously, I would love feedback. Since this is a new thing, obviously it might have kinks to smooth out. Let me know what you think?


Monday, March 4, 2013

Lucky Angel

Just a quick layered look for your enjoyment:


The hot pink is Wet & Wild Lady Luck, and it's topped with China Glaze Angel Wings. Mmm gold holo microglitter! :D 

I needed some vivid color to brighten up my winter blahs. Spring is on the way, but it's sure taking its sweet time about things! I'm so ready for it!

Wednesday, February 20, 2013

Playing with Layering

This was just something I did super quick as a curiosity test, I kinda liked it so here's the results!


I started with a L.A. colors tangerine orange (name unknown, it came in a mini-set). 

Then I layered a sheer pink with strong blue shimmer (Nina Ultra Pro Pink Frost) on top:


Mm, glowy and a little odd. Just the way I like my nails! :D

Tuesday, December 11, 2012

Dancing Gold

Another quick manicure, just a glitter topper:


The base is Sinful Colors - Dancing Nails, and the glitter is an unnamed gold glitter from a Bonita set I found at Ross. 

Dancing Nails is one of my favorites from Sinful Colors. It's similar to my much loved Mama-San, which I must've been either a LE or discontinued shortly after I discovered the brand, I haven't seen it since. 

I really like this color combination, a shimmery rose tone with gold glitters! Kinda similar to the layering I did here.

Thursday, November 29, 2012

Knackered Coral (palate cleanser!)


Once in a while, we all get tired of the work that goes into fancy nails... but of course life doesn't stop, friends have birthdays at less-than-ideal moments... and no polish fetishist wants to show up at a party with naked nails!


So here's a little quick NOTD I threw together to match my party outfit. It's nothing more than one coat of Butter London Knackered over two coats of Orly Gilded Coral, topcoat and done! 

Nothing too fancy, but gorgeous in a subtle way! I was super happy with this mani.

Monday, November 5, 2012

Diamond Glitter Skittles


I finally got some polishes with diamond glitters, and I just couldn't wait to try them all out! So I went ahead and did a skittles mani with the four new Pure Ice polishes I picked up last time I was at WalMart.


A rare right-hand shot! I dinged up my left hand before I could get any pictures, unfortunately! So I had to resort to photographing the less pretty side. I photoshopped out a major hangnail so you don't have to look at that, at least!

Yes, I know, there's one nail without diamond glitters! It's the one polish I picked up that didn't have them, so I did it accent-nail style. 

The polishes I used were:
pinky - Three coats of L.A. Colors Live, one coat of Pure Ice Material Girl
Ring - Two coats of L.A. Colors Sea Siren, two coats of Pure Ice French Twist (I stamped over this with the new Sally Hansen Hidden Treasure, but it doesn't really show) 
Middle - Three coats of Sinful Colors This Is It, one coat of Pure Ice Treasure Hunt
Index - Two coats of Wet & Wild Caribbean Frost, one coat of Pure Ice Hot-Rocks 

French Twist has a black jelly base, like Revlon Scandalous and Wet & Wild Fergie Make Them Boys Go Loco. I'm just collecting all the colors of this family! :D

The diamond glitters in Hot-Rocks came out easily, but for Treasure Hunt and Material Girl I had to fish and place. All the glitters were reasonably smooth, I only needed two coats of top coat on my pinky because it's so tiny and highly curved... and only for the diamond near the cuticle. There was the tiniest bit of grittiness noticeable in a few spots, which doesn't bother me, but if you like super-glassy finish on your manicures better plan on double top coat.

This Is It is still a tad sheer at three coats, like a lot of Sinful Colors polishes. If you don't have much free edge you could probably get away with it, but to be sure of coverage I'd layer it over a creme.

My favorite of these was my pinky. I really really like the pink glitter over silver! The rest kinda turned out meh IMO. Any standouts to you?

Sunday, October 7, 2012

Duochrome/glitter layering

Well, since I caved and bought the two polishes I was missing from the China Glaze Bohemian collection, I guess I'd better go ahead and do some nails with 'em, yes/yes?


This is two coats of China Glaze No Plain Jane topped with one coat of Tonight's Gonna Be A Good Night from Wet & Wild's Fergie collection. 

I love me a nice duochrome, and feel the same about black glitter, so this was bound to happen sooner or later!

How do you feel about black glitter? Love it? Hate it? Indifferent?

Friday, September 28, 2012

31 Day Challenge Day 29 - Inspired by the Supernatural

I thought of all the obvious halloween themes. Ghosts, witches... then I thought of mythical creatures like unicorns or fairies... and then I thought of tarot cards, which led me to this skittles mani, inspired by  the five elements of the old Chinese system (except I screwed it up and used Air as an element, despite it not being in the Chinese system... should be Earth instead, I was dumb and didn't check ahead of time).

Metal, Fire, Water, Air, Wood

On my thumb (Metal) I used Wet & Wild Bad For Credit Cards, with the bullseye from the new China Glaze magnet. 
On my index finger (Fire) I started with two coats of Nina Ultra Pro Molten Gold, added a dabbled layer of the orangey copper glitter from the Bonita glitter set, and finished with a third coat of Molten Gold.
My middle finger (Water) is Claire's blue magnetic polish with the magnet it came with.
My ring finger, representing Air, is Wet & Wild Chrome Stay Outta My Bismuth topped with an iridescent glitter polish from Simple Pleasures that was gloppy and obnoxious to work with (have I mentioned yet how unimpressed I am with that set?)
My pinky represents Wood/Earth and is done with Claire's green magnetic and the magnet it came with.


Wednesday, September 12, 2012

31 Day Challenge Day 22 - Inspired by a Song

For my song inspiration I picked She Dreams In Blue by the amazing and talented Josh Woodward, one of my favorite musicians of all time! You can have a listen to She Dreams In Blue here, and while you're at it I strongly recommend checking out his other tunes. They're all free, so don't be afraid to download a few if the desire strikes you (and trust me, there's something for everyone!). 

Ok, now that I'm done plugging one of my favorite people ever, have a look at my pretty fingers! 


This one took many, many attempts before I was finally happy with it. Originally I planned a watercolor mani, but the one pale blue I had for the base didn't want to cooperate. It's from that crummy Simple Pleasures set, and besides being super sheer and requiring lots of babying to avoid major streaks I could *not* get it to dry. So I scrapped that and dug around in my blues a little more hoping for a new inspiration.. which appeared in the form of Essie - Stroke of Brilliance, from the Luxeffects collection. Such pretty periwinkle-blue glitter!

I decided to jelly sandwich it with that sheer Simple Pleasures mess on top, hoping that maybe, just maybe, I could get only one coat of the stuff to dry. For undies I picked BB Paris - Curacao, which is a little darker with a pretty silver shimmer (I probably could have used that as a base for my original watercolor idea, but by the time I found and remembered I had it, I was hooked on the jelly-sandwich-with-Essie thing).

So that's the complicated story of these not-so-complicated nails. 

Unfortunately even with only one coat, the sheer blue wouldn't dry right and I had to take these off when I dinged them up making lunch shortly after taking pics. :(

And that, kids, is why impulse buying super cheap polishes can be a Really Bad Idea. The Simple Pleasures set, with its horrid streaky-sheer formulas, is a near-total waste of money and space in my polish drawer. My hoarder inclinations and the fact that yes, I did spend money on them are the only things keeping me from throwing them away just yet. I'll probably dump the polishes and franken in the bottles at some point.


Sunday, August 26, 2012

31 Day Challenge Day 17 - Glitter

I wanted to do something different for glitter day. I've kind of overused gradients for this challenge, which is always the first thing I think for nail art with glitter, and the second thing I think of is jelly sandwich, which I tend not to love my execution of (and have already done once in the challenge). :/ 
In the end I decided to take the jelly sandwich idea and tweak it a little, giving me:


A shimmer sandwich!

Going back to my love of Wet & Wild polishes yet again for this one, I started with a base of Blue Moon, then a layer of Party of Five Glitters, and finished it off with a coat of Grey's Anatomy.


Saturday, July 14, 2012

31 Day Challenge Day 6 - Violet

Ok, yeah, I REALLY got lazy on the cleanup on this one. In my defense I did it at work on a slow day, and I have shitty lighting at work. And when I got home I didn't feel like bothering.


For violet I decided to make a jelly sandwich. For the base and top layers I used two L.A. Colors polishes that came in a set of mini bottles from Ross, the fuschia creme (polish name unknown) and Nuclear Energy (purple jelly). In between I used Orly - Can't Be Tamed from the Glam FX collection. I think it turned out really pretty well, considering I've never been a fan of my jelly sandwich skills.... I actually do like this one.


Saturday, May 26, 2012

Vampy sparkles

Just a little quickie layering today. 

I managed to not paint all over my fingers! Be proud of me!

I started with one careful coat of China Glaze - Seduce Me, added another careful coat of Wet & Wild Wild Shine - Night Prowl, and then halfway down a layer of Revlon - Scandalous.

Both Night Prowl and Scandalous are purple glitters in a black jelly base, but Night Prowl only has microglitter while Scandalous has microglitter and hex glitter. The jelly base lets Seduce Me show through in good light, giving it a more purple-pink tone behind the black and a very subtle gradient look.

Wednesday, May 23, 2012

Fireworks

I promised nail art with the rest of the Sparks & Stripes collection. Here it comes.... 
 I started with a base of Sally Hansen Xtreme Wear - Golden-I, and sponged on skittles with the glitters to get decent coverage. 


Thumb: Beautiful But Dangerous
Index: Light With Caution
Middle: School of Pyrotechnics
Ring: Explosions After Dark
Pinky: Spontaneous Combustion

After two coats of fast-dry topcoat to smooth out the super-gritty results of the sponging, I painted on one thick coat of Wet & Wild Wild Shine - Black Creme and immediately pressed a crumpled up plastic bag into it to remove the polish in a random pattern. Then another two topcoats.


My index finger turned out best, I think. The rest look more messy than firework-y.

The bag method definitely turned out better than my original idea of using black crackle polish over the glitters. It didn't crack well and the bits that did crack didn't have the firework look I was going for.. it really just looked weird, and I quit after two fingers and went for the bag.


Someday I'll learn to do my nails without making a mess of my fingers. I think I'm finally getting the hang of cleaning up the disaster at least. 

Thursday, May 17, 2012

First half-moon

The other day I stumbled across a display of Wet & Wild's Sparks and Stripes collection. Fantastic set of glitters. Four repromotes from the Spoiled collection, and two new polishes, one of which I'm showing off today along with my first attempt at a half-moon mani:


For this I started with two coats of Wet & Wild Wild Shine - Wild Card, let it dry, and marked off my moons with old garage sale price stickers. Then I added one coat of Revlon - Smoldering, removed the stickers and topped with two coats of Wet & Wild Fast Dry - Stars and Stripes. 

I have a weakness for holo glitter... and this is not only holo, but holo STARS and two sizes of holo bar glitter. I've never seen a polish like it. 

The stars required fishing and fussing with to get them placed, the base is super thick and goopy, and the bar glitters are sparse, but it has a really cool look (and the thick base helps keep the points on the stars from sticking out and snagging on things). I placed the stars with the first coat, then intentionally avoided getting any more stars in the second coat to smooth out the surprisingly few snaggy bits.

For the rest of the collection, I have some fantastic nail art planned. Hopefully it will turn out as well as I imagine it...

Tuesday, May 8, 2012

Layering madness!

The nails I'm rocking today started as an attempt to kill my huge lemming for Color Club's Take Wing collection by layering Sinful Colors - Glass Pink over something bright and shimmery. I figured it was sheer enough to not mess with the base color, but it's deliciously glassflecky. Sounds like a good idea, no? It came pretty close.

Please pardon the tiny bitten-off nubbin nails... all my horrible nervous habits have been kicking in full force lately

This is one coat of Glass Pink over two coats of Sinful Colors - Oledia. (I've only ever seen one bottle of Oledia, the one I bought... I think Oledia is pretty similar to Let's Meet, though I only own Oledia so can't make a proper comparison. From swatches I've seen, Let's Meet might be more glassfleck instead of shimmer, and possibly a slightly lighter/brighter yellow.)

Edited to add: Oledia stains. Double base coat highly recommended.

I think this idea might save me from having to buy ALL of the Take Wing gorgeousness, though I did give in and buy the green at Claire's (they have the Claire's logo and different names, but a little tiny Color Club logo on the back so I bet it's the same polish). I'm trying so hard to be good and not buy things that there's a good chance I'll just have to pack up and move, but I had a moment of weakness after dealing with trying to get my half-dead phone replaced. It was frustrating and I guess I was going for retail therapy... More on that later.

Anyway. This morning when I did my nails, I kept them to the two layers for a while and then decided I wanted something a little fancier. I thought of doing some nail art, but as I was rummaging around in the stash for my stripers and dotting tools something else caught my eye.


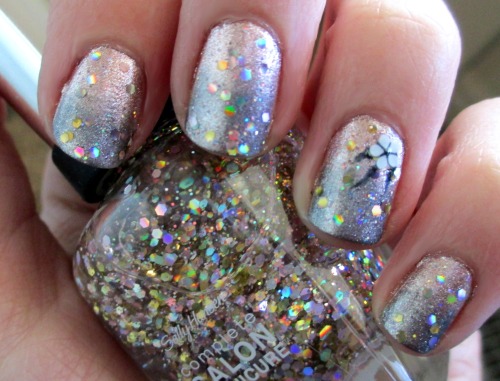
So I layered on one coat of Sally Hansen Diamond Strength - Glass Slipper. I love the sheer silvery flakies!

This was better. I still wasn't quite happy with it, but decided to give it a chance to grow on me and do my errands. Which involved the mall for phone replacment and the resulting retail therapy.

Claire's caught me. I walked out of there with two mini-bottle collections and three single polishes, one mini and two full. All fabulous. Since I wasn't really loving my nails, I decided to go ahead and layer one of the new lovelies on top. I picked the black-and-holo from the Disco Inferno set (mini's didn't have individual polish names that I can tell).

The set has a clear base silver holo bar glitter, a creamy shimmer hot pinky-purple with micro holo glitter, a gunmetal glassfleck, a hot pink creamy shimmer with silver microglitter, and the jewel of the collection (the one I used), holo bar glitter with black bar and small hex glitters, also in a clear base.


Finally happy with this mani :D

Love it. The glitter was sparser than I would have preferred, I had to put it on fairly thick and fuss it around to get a look I liked, but in the end it was totally worth the trouble. The glitters lay nice and flat on the nail, which is fabulous. One layer of topcoat was enough.

I'm looking forward to playing with the rest of the Claire's mini bottles. I also picked up the Precious Metals set, which is all medium hex glitter and clear base, one straight silver holo, one with a lavender and a slightly darker purple, one with green, teal and pink (reminds me of a peacock :D), one with just teal and pink, and one with silver holo and black. To be completely honest, the ones I would have picked out on their own would be the two with black glitter. I had nothing in my stash with black glitter, and it's just so differently awesome. 

I mentioned I picked up the lime green glassfleck, Claire's has them as the Starstruck collection, and they look like pretty much the Take Wing collection without yellow and light blue. For Claire's the particular polish name is Blast Off.

The other mini is a sheer tan shimmer with small silver glitter, bubblegum scented. It was on clearance and too cute to pass up! It smells super yummy too. My first scented polish! I've been wary of them smelling horrid... nice to be proven wrong at least in one case!

And finally (last but certainly not least) I picked up Night Sky. Tiny silver holo and dark blue glitters in a clear base. I'm hoping really hard that it won't be as sparse as the others seem to be, I want to wear it on its own!